Navigation
Install the app
How to install the app on iOS
Follow along with the video below to see how to install our site as a web app on your home screen.
Note: This feature may not be available in some browsers.
More options
Style variation
You are using an out of date browser. It may not display this or other websites correctly.
You should upgrade or use an alternative browser.
You should upgrade or use an alternative browser.
GR86 Focal 2 way component OEM retrofit
- Thread starter Dal3D
- Start date


TheRealMyodo
Devoted member
Hmm the site won't let me attach the .jib as it is not an allowed file type. Happy to share - if anyone wants the file just message meI believe with the C7 software, you can save the setup as a file and upload it for others to try, as well as just applying it to the amp.


Bluemanc100
Totally Hooked
- Jul 4, 2023
- 711
- 848
Just the speakers? I can’t be bothered to try and fit the amp but the speakers look like a doddle and I might be able to get the capex approved by SWMBO for the speaker kitJust installed my focals. they sound amazing!
Many thanks Dal3D for the instructions. It made the install so easy. And inspired much needed confidence.

OldManMarkoos
Devoted member
- Jan 7, 2023
- 94
- 139
So far just the speakers (and sound deadening).Just the speakers? I can’t be bothered to try and fit the amp but the speakers look like a doddle and I might be able to get the capex approved by SWMBO for the speaker kit
Puzu arrives on Thursday. I couldn't resist

Last edited:
You could try putting in a .zip file although I don't know if the site allows that either, might only allow images.Hmm the site won't let me attach the .jib as it is not an allowed file type. Happy to share - if anyone wants the file just message me
Do you mind me asking...you appear to have set up different curves for left and right speakers. Shouldn't they be the same, if they are the same speaker setup? I gather you've used a time alignment microphone, but not set any time delays...is that because you're setting the curves differently?
I am an audiothicko.

KobayashiMaru86
Totally Hooked
If you find out how to get that bolt back, let me know so I can get the 10mm I lost too. I fear it will be head unit completely out then somehow most of the airconOk, installed the Puzu amp yesterday. Straightforward apart from dropping one of the HU bolts down the back. So if anyone has any retrieval tips I'm all ears!
Took some measurements and knocked up an initial set of filters. The attached screenshots show the smoothed response at the drivers head position and my C7 settings, targeting a Harman curve from 20 - 20kHz. Interestingly the C7 PEQ settings won't accept arbitrary values - they self adjust to the nearest 'allowed' values so I couldn't quite replicate exactly the filters from REW but close enough.
Already sounding great to these ears!
View attachment 21340
TheRealMyodo
Devoted member
Not at all. Because the listening position is off centre in the driving seat, the path from speaker to ear are different left and right, as are all the reflections that contribute to what you hear. You can see the difference on the red ( left ) and green ( right ) response curves. So I'm equalising each side differently to get what I hear as close as possible to the same left and rightYou could try putting in a .zip file although I don't know if the site allows that either, might only allow images.
Do you mind me asking...you appear to have set up different curves for left and right speakers. Shouldn't they be the same, if they are the same speaker setup? I gather you've used a time alignment microphone, but not set any time delays...is that because you're setting the curves differently?
I am an audiothicko.
But isn't that what the time delay setting is for? Or is your method just more accurate/reliable?Not at all. Because the listening position is off centre in the driving seat, the path from speaker to ear are different left and right, as are all the reflections that contribute to what you hear. You can see the difference on the red ( left ) and green ( right ) response curves. So I'm equalising each side differently to get what I hear as close as possible to the same left and right
On the previous car I had a Pioneer head unit for a while which had an automatic TA setup with a compatible microphone. Did seem to make an improvement. So I'm keen to see if I can replicate that hear even with out a microphone.
TheRealMyodo
Devoted member
The time delay settings are to get the sound from each speaker, which are all at different distances, arriving at your ears at the same time. The small time delays at play here will have a small effect on the frequency response - due to the different effects of phase cancellation and comb filtering at different frequencies - but mainly the time delay helps with sharpening the stereo image, transients and overall 'clarity'. I haven't bothered trying to time align -yet. I may give it a go later when the urge to nerd returnsBut isn't that what the time delay setting is for? Or is your method just more accurate/reliable?
On the previous car I had a Pioneer head unit for a while which had an automatic TA setup with a compatible microphone. Did seem to make an improvement. So I'm keen to see if I can replicate that hear even with out a microphone.

The EQ settings have a bigger effect on the overall tonality and frequency balance across the audio spectrum ie bass is in balance with vocals which are in balance with high hats. So EQ gets you 80 % of the correction you're looking for, time delays the rest.
See also The Haas Effect
FRAJ
Obsessed member
The PUZU sounded a good idea, so I fitted it tonight. That's another £100+ this forum cost me, but I would have paid for the premium sound system had it been available from Toyota.
Plus points: Installation was really easy, on a par with the speakers and truly plug and play with the #7 harness. It arrived via FedEx in 6 days which is impressive. More impressive was that I didn't lose a bolt down the back of the dash. It does sound better, but I still need to play around to get it right - certainly without it, there were some songs that sounded a bit grating on the mid to higher end that I wanted to improve.
Negative points: The android app made the music cut in and out when I had it connected. Maybe something I did. Also, there's so many adjustments I must have set something wrong or missed a trick.
My only additional advice is that the HU need a good pull to get it out once the bolts are removed (I thought I must have missed a bolt!)
Finally, it was only easy 'cos @ninjin already did it. Thanks!
Plus points: Installation was really easy, on a par with the speakers and truly plug and play with the #7 harness. It arrived via FedEx in 6 days which is impressive. More impressive was that I didn't lose a bolt down the back of the dash. It does sound better, but I still need to play around to get it right - certainly without it, there were some songs that sounded a bit grating on the mid to higher end that I wanted to improve.
Negative points: The android app made the music cut in and out when I had it connected. Maybe something I did. Also, there's so many adjustments I must have set something wrong or missed a trick.
My only additional advice is that the HU need a good pull to get it out once the bolts are removed (I thought I must have missed a bolt!)
Finally, it was only easy 'cos @ninjin already did it. Thanks!
TheRealMyodo
Devoted member
I found this video from Alpine on time correction. I'm going to give this a whirl tomorrow
https://youtu.be/ONh6wjgWZzo?si=8Sq7JwFaTIiq6QC4
https://youtu.be/ONh6wjgWZzo?si=8Sq7JwFaTIiq6QC4
TheRealMyodo
Devoted member
Hi all
Ok I've had a play around with time delays, remeasured and created a new set of filters which allow for the delays. I've also applied EQ to the rear speakers and adjusted the gain on these.
I've targeted the Harman curve, so this gives a pretty balanced tonality overall with a bit of a boost in the low end. If you're a real basshead, you might prefer a bit more in the bottom.
Puzu file, screenshots and the REW measurements, for those interested, all in the zip at the link attached. Enjoy
Car2.zip
PS The password is the model name of our favourite motor vehicle
Ok I've had a play around with time delays, remeasured and created a new set of filters which allow for the delays. I've also applied EQ to the rear speakers and adjusted the gain on these.
I've targeted the Harman curve, so this gives a pretty balanced tonality overall with a bit of a boost in the low end. If you're a real basshead, you might prefer a bit more in the bottom.
Puzu file, screenshots and the REW measurements, for those interested, all in the zip at the link attached. Enjoy
Car2.zip
PS The password is the model name of our favourite motor vehicle

Thank you. Great timing. Just got my Puzu working.Hi all
Ok I've had a play around with time delays, remeasured and created a new set of filters which allow for the delays. I've also applied EQ to the rear speakers and adjusted the gain on these.
I've targeted the Harman curve, so this gives a pretty balanced tonality overall with a bit of a boost in the low end. If you're a real basshead, you might prefer a bit more in the bottom.
Puzu file, screenshots and the REW measurements, for those interested, all in the zip at the link attached. Enjoy
Car2.zip
PS The password is the model name of our favourite motor vehicle
Thanks. I've got the last setup you gave me applied currently but hadn't set the time delays yet. I'll try this one now.Hi all
Ok I've had a play around with time delays, remeasured and created a new set of filters which allow for the delays. I've also applied EQ to the rear speakers and adjusted the gain on these.
I've targeted the Harman curve, so this gives a pretty balanced tonality overall with a bit of a boost in the low end. If you're a real basshead, you might prefer a bit more in the bottom.
Puzu file, screenshots and the REW measurements, for those interested, all in the zip at the link attached. Enjoy
Car2.zip
PS The password is the model name of our favourite motor vehicle
OldManMarkoos
Devoted member
- Jan 7, 2023
- 94
- 139
I aim to install the puzu tomorrow so this is perfect timing.Hi all
Ok I've had a play around with time delays, remeasured and created a new set of filters which allow for the delays. I've also applied EQ to the rear speakers and adjusted the gain on these.
I've targeted the Harman curve, so this gives a pretty balanced tonality overall with a bit of a boost in the low end. If you're a real basshead, you might prefer a bit more in the bottom.
Puzu file, screenshots and the REW measurements, for those interested, all in the zip at the link attached. Enjoy
Car2.zip
PS The password is the model name of our favourite motor vehicle
Many thanks in advance!
OldManMarkoos
Devoted member
- Jan 7, 2023
- 94
- 139
Hi Guys,
I've got this far, but the headunit won't pull out any farther.
Is it just a case of getting my hands behind there and unplugging everything?
TIA, OldMan

I've got this far, but the headunit won't pull out any farther.
Is it just a case of getting my hands behind there and unplugging everything?
TIA, OldMan
You shouldn't need to unplug everything, but I guess there's a wire which is snagged and preventing you pulling it forward further. Ideally, you only need to be able to pull it out enough that you can tilt the whole thing down, and that should give you access to the back.Hi Guys,
I've got this far, but the headunit won't pull out any farther.
Is it just a case of getting my hands behind there and unplugging everything?
TIA, OldMan
View attachment 21742
The connectors you need are at the bottom right of the unit (as you look at it). There's also some connectors on the top right, it might make it easier if you disconnect those just so you can get access to the ones you need.
OldManMarkoos
Devoted member
- Jan 7, 2023
- 94
- 139
That's what I figured .You shouldn't need to unplug everything, but I guess there's a wire which is snagged and preventing you pulling it forward further. Ideally, you only need to be able to pull it out enough that you can tilt the whole thing down, and that should give you access to the back.
The connectors you need are at the bottom right of the unit (as you look at it). There's also some connectors on the top right, it might make it easier if you disconnect those just so you can get access to the ones you need.
Thanks for the quick response.
OldManMarkoos
Devoted member
- Jan 7, 2023
- 94
- 139
So... got it done, but that was a mission!
Luckily I have small hands and skinny arms, but some of those connectors are tight.
The bottom 3 white connectors were really short.
In the photo, below, you can see the 2 bottom right connectors pulled tight; they do not pass the rear frame.
After all this, I got stuck in my building's lift for an hour, so I've not connected to it yet for tuning etc ...

Luckily I have small hands and skinny arms, but some of those connectors are tight.
The bottom 3 white connectors were really short.
In the photo, below, you can see the 2 bottom right connectors pulled tight; they do not pass the rear frame.
After all this, I got stuck in my building's lift for an hour, so I've not connected to it yet for tuning etc ...
OldManMarkoos
Devoted member
- Jan 7, 2023
- 94
- 139
While I had the head unit out, I disconnected the ASC speaker cable so I could hook it up to a HiLo converter and then plug it into the Aux socket and play fake engine noises through some decent speakers.
Unfortunately it still sounds like arse. There is a definite time delay, so it sounds a bit like reverb. Like if you've ever listened to the TV through a sound bar while the TV speakers are still active...
It does work however, so, give it a go if you want, some basic instructions below.
The ASC cable connector is white and pushes up into the beige connector which is firmly attached to the back of the black speaker box. So to disconnect, you have to squeeze the lower corners and push down. There's not a lot of room and it is quite stiff.
After disconnecting it you can push it back through to the glove compartment area.

Photo from top down.

Success!
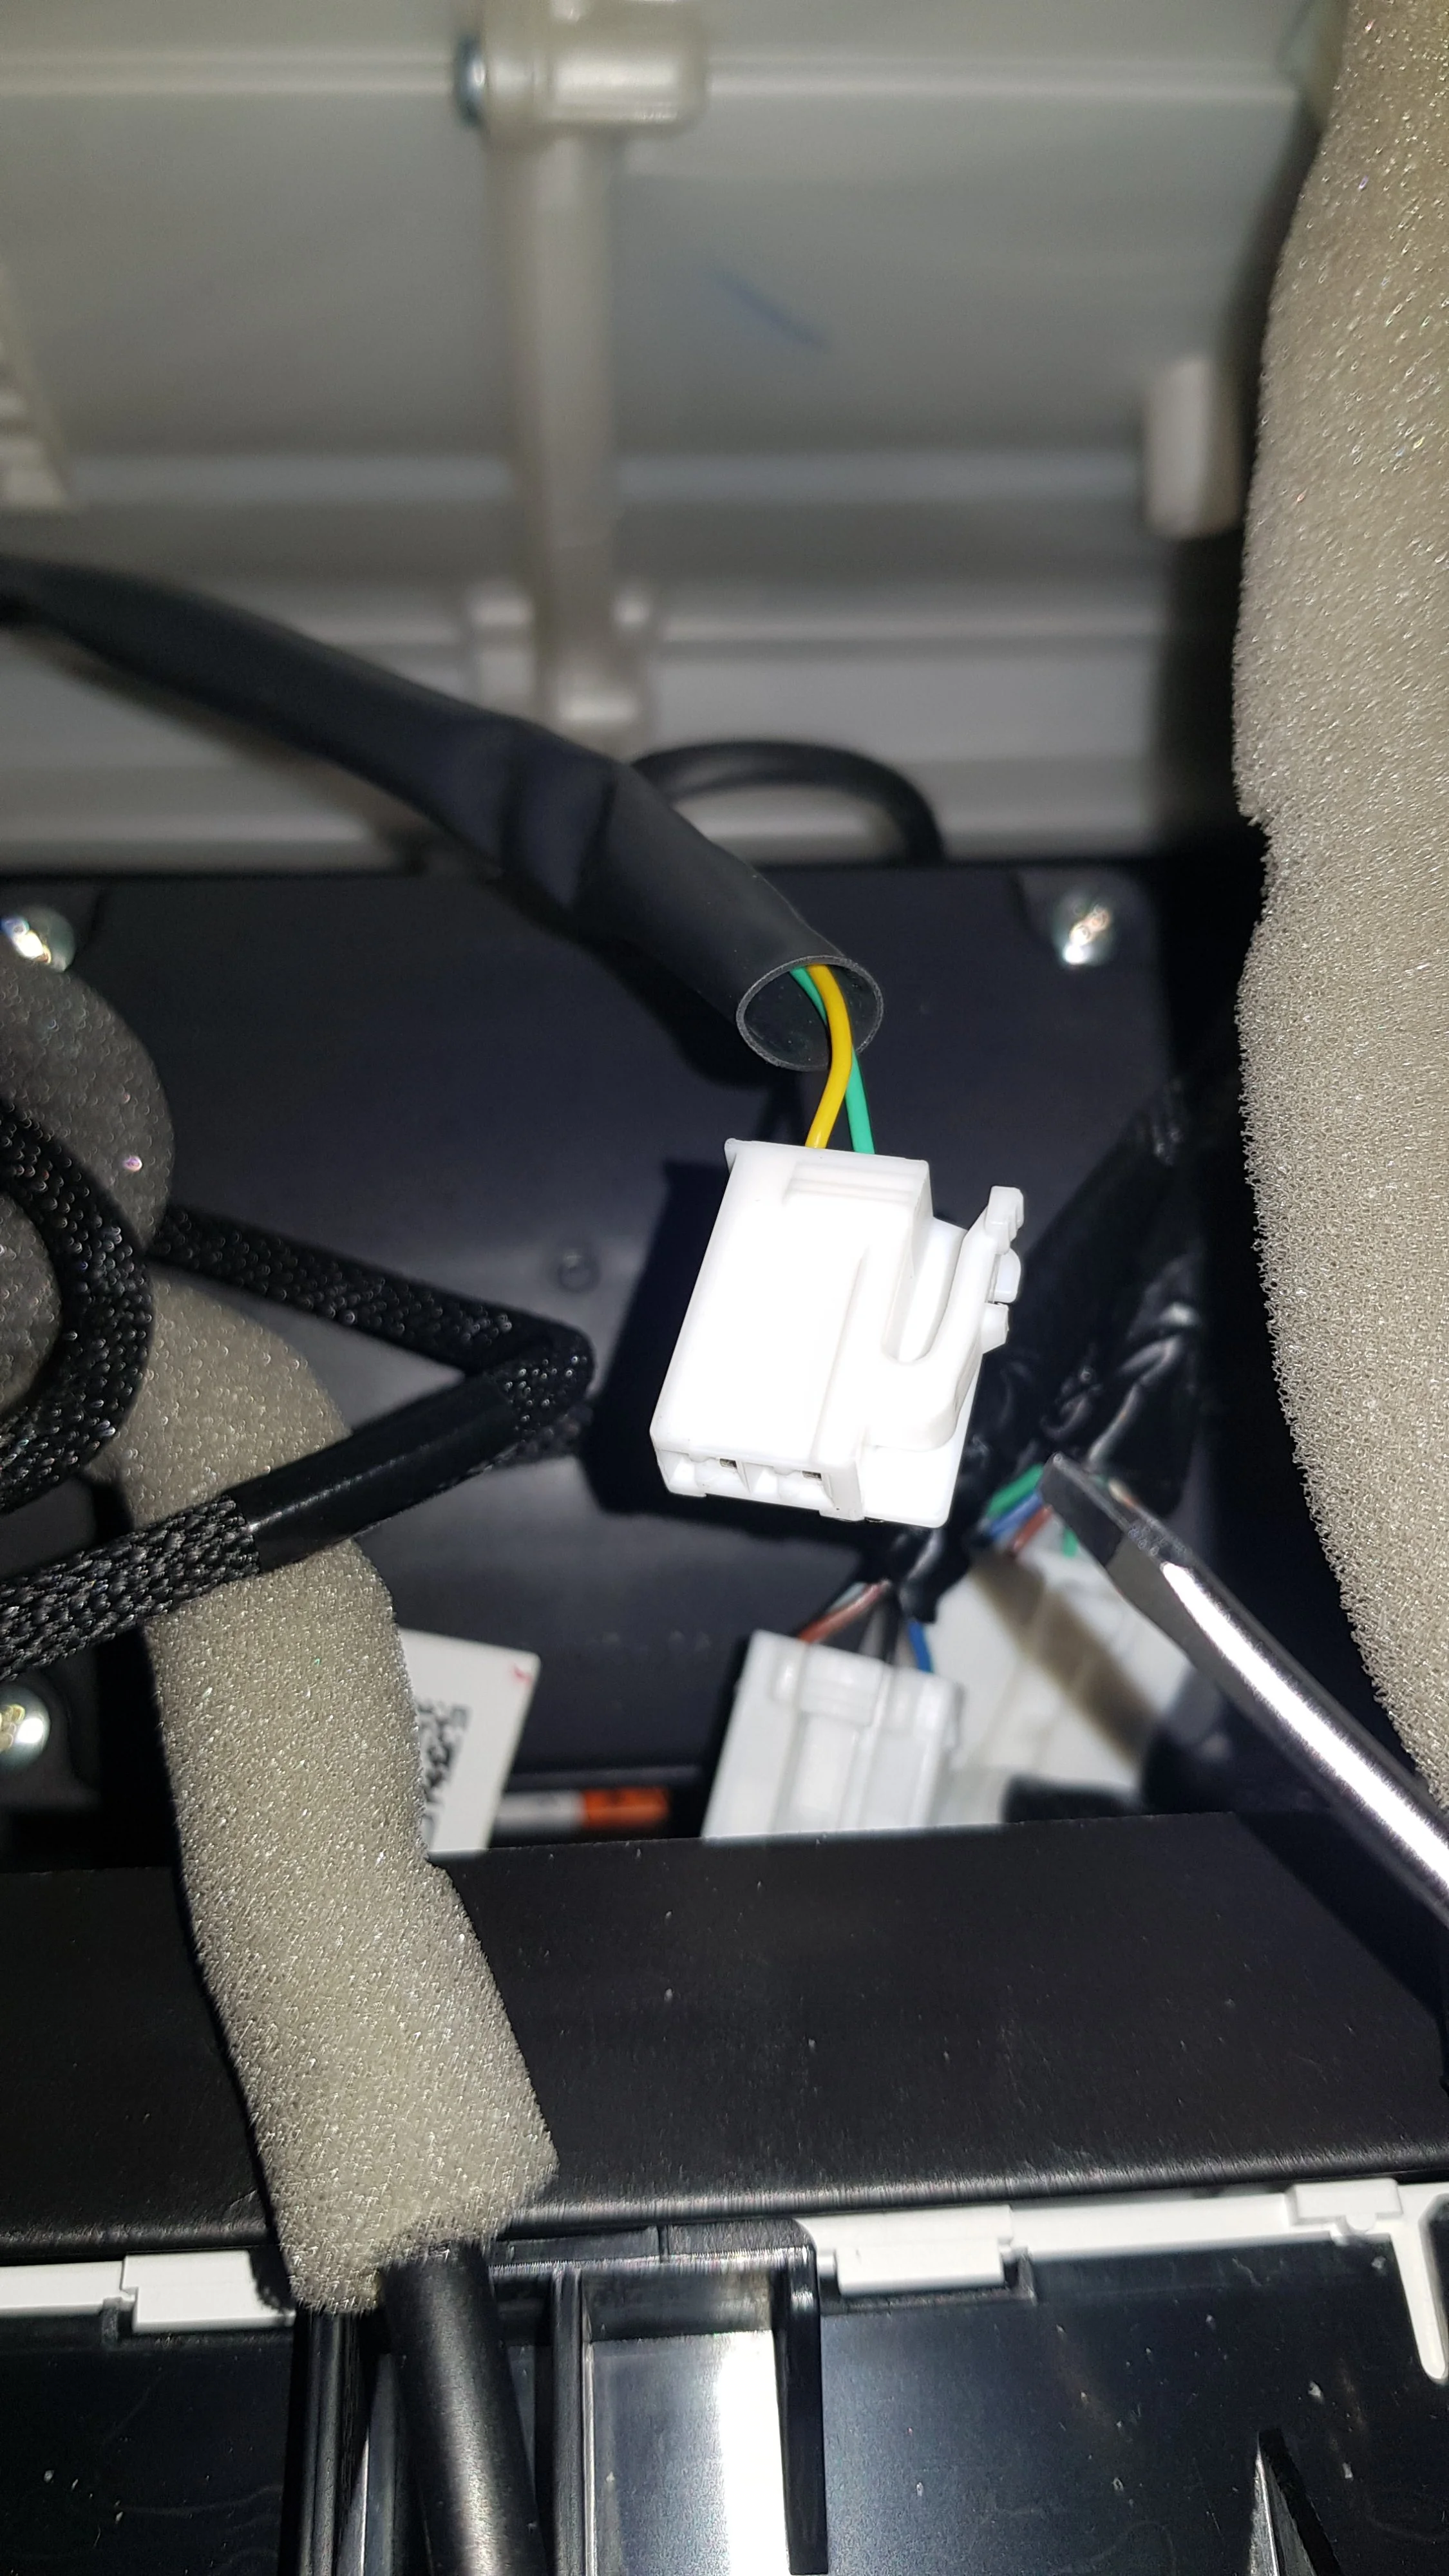
One of the spare speaker cable adaptors from the focal kit is a match for this connector type.

Finally, I removed the spade connectors. And used a choccy block to connect the mono speaker signal into the stereo HiLo converter and then plugged that into the Aux connector in the armrest.

Had the result been better I would have connected all this properly, but my short test says it's probably not worth it.
Unfortunately it still sounds like arse. There is a definite time delay, so it sounds a bit like reverb. Like if you've ever listened to the TV through a sound bar while the TV speakers are still active...
It does work however, so, give it a go if you want, some basic instructions below.
The ASC cable connector is white and pushes up into the beige connector which is firmly attached to the back of the black speaker box. So to disconnect, you have to squeeze the lower corners and push down. There's not a lot of room and it is quite stiff.
After disconnecting it you can push it back through to the glove compartment area.
Photo from top down.
Success!
One of the spare speaker cable adaptors from the focal kit is a match for this connector type.
Finally, I removed the spade connectors. And used a choccy block to connect the mono speaker signal into the stereo HiLo converter and then plugged that into the Aux connector in the armrest.
Had the result been better I would have connected all this properly, but my short test says it's probably not worth it.
Last edited:
