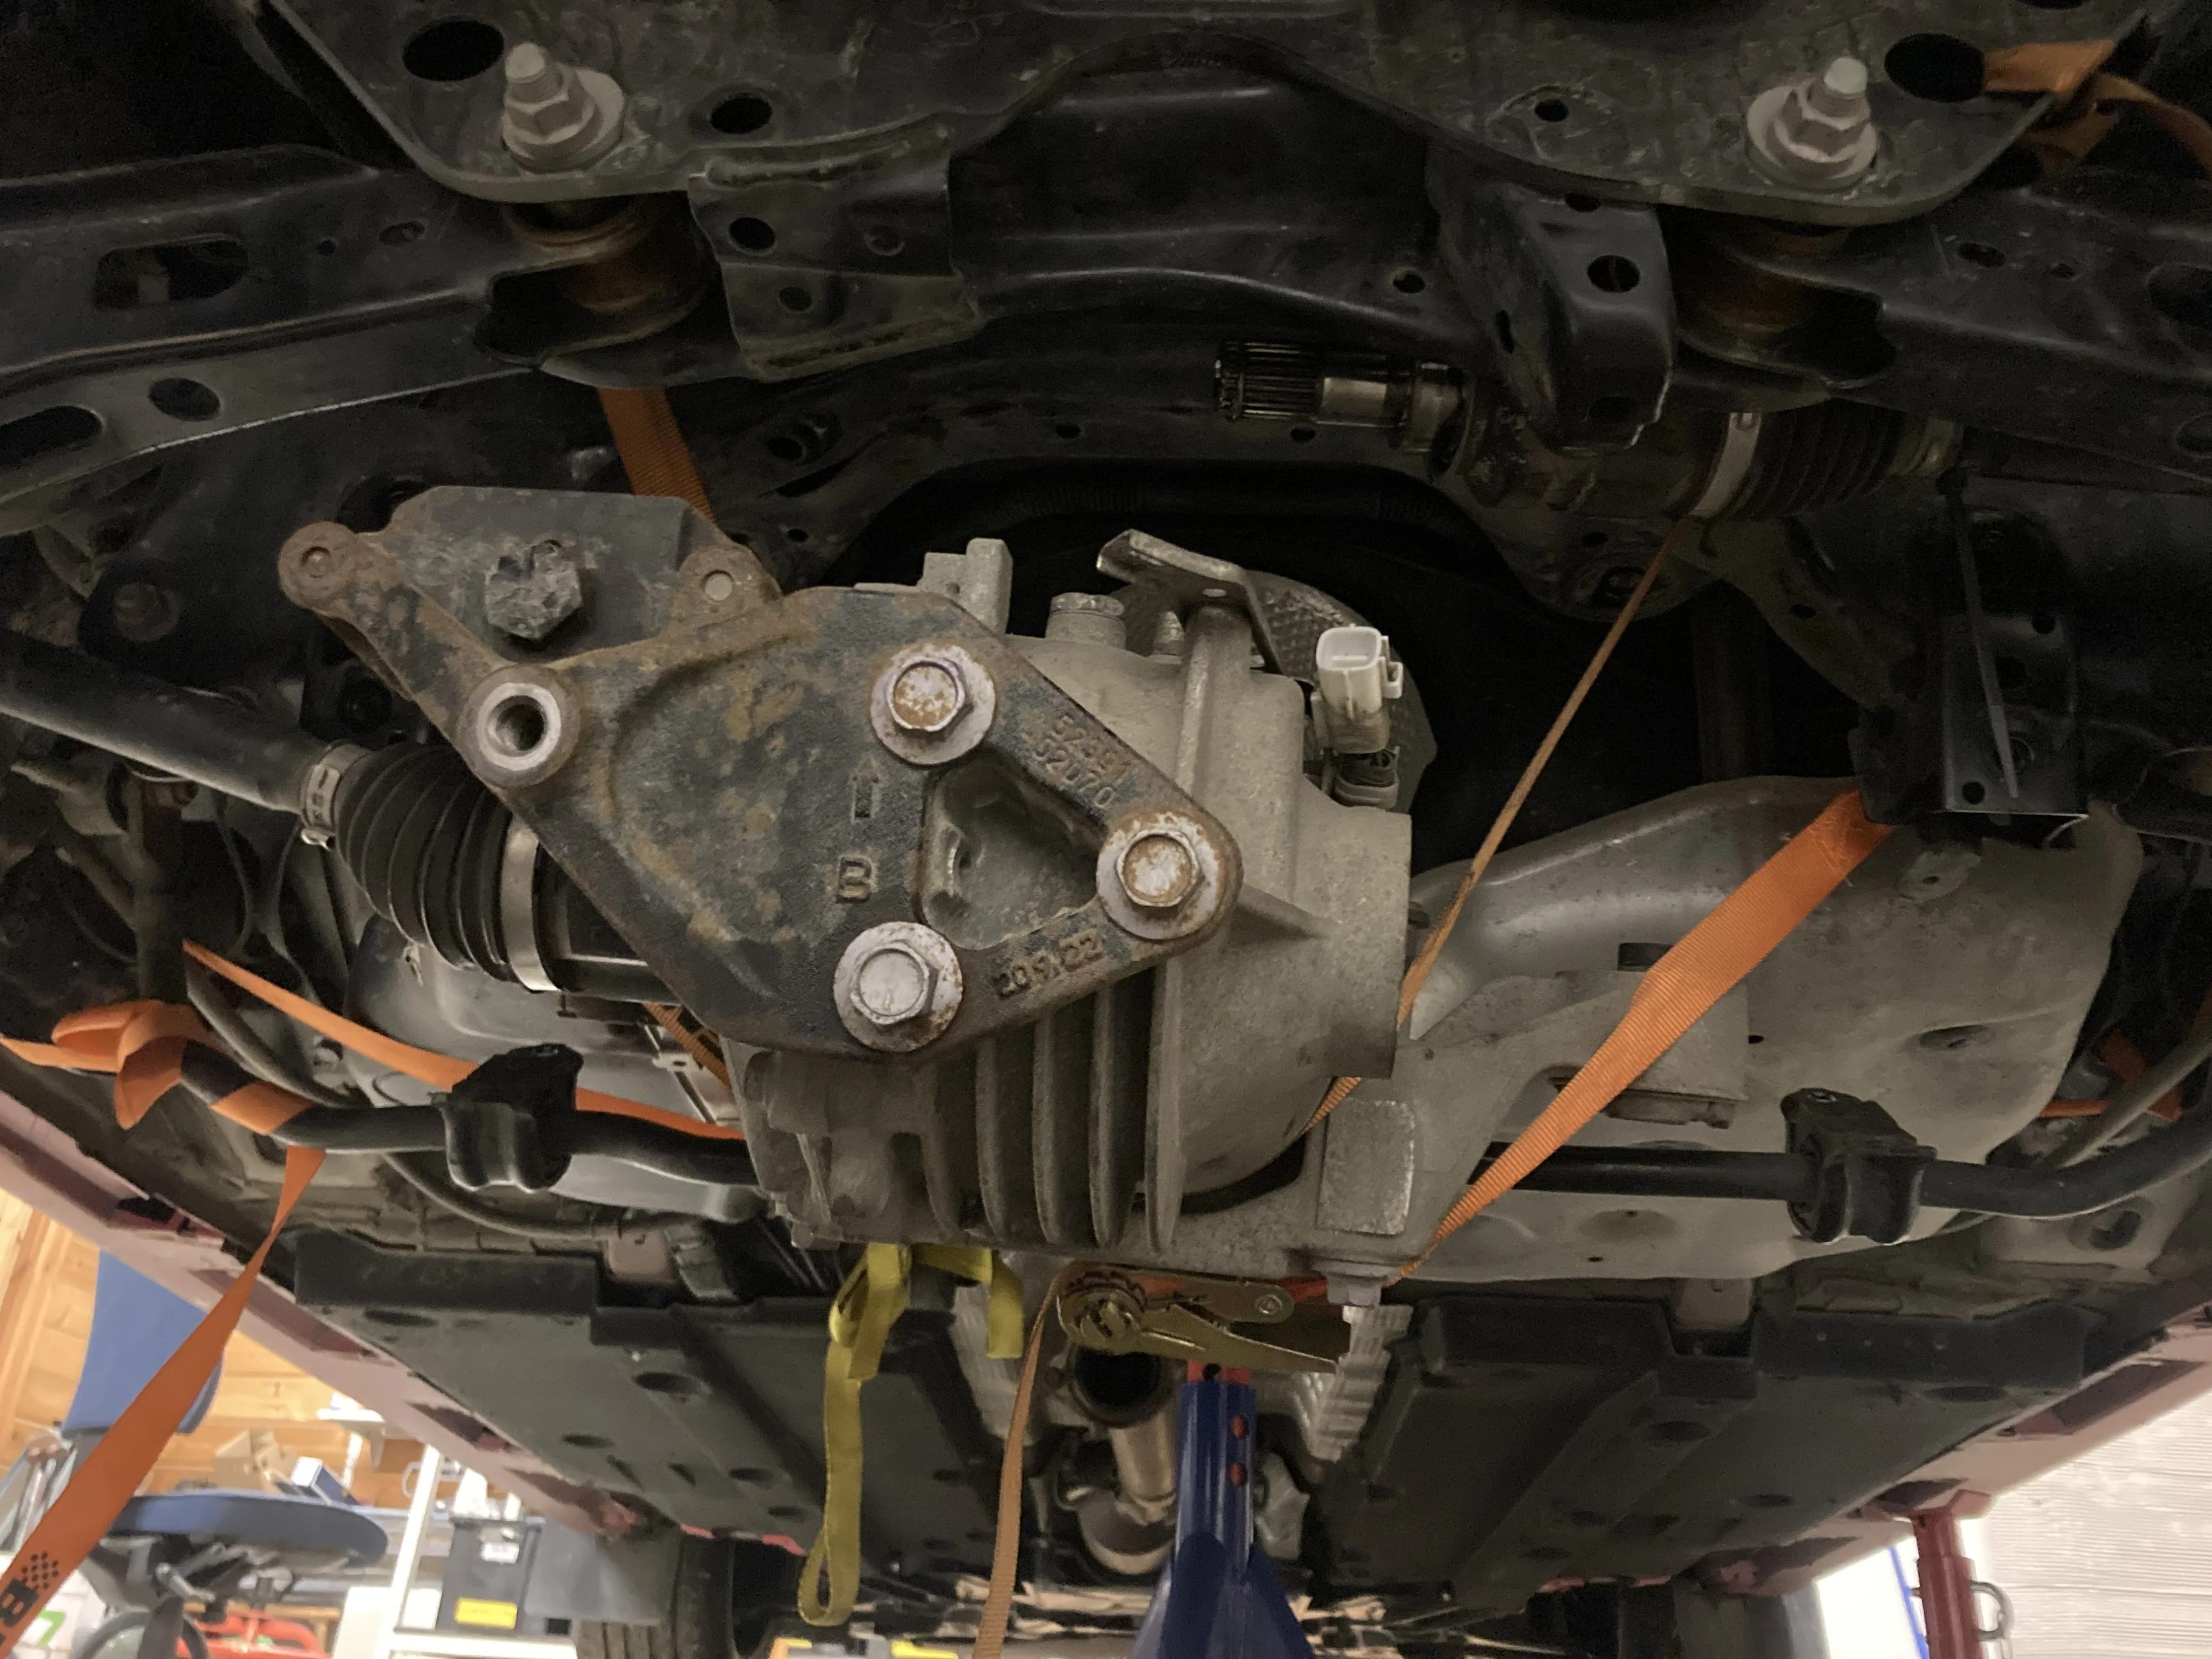
GR Yaris Cusco rear LSD assembly & differential removal

TLS

Fascinated Member
Joined
Oct 26, 2023
Messages
9
Reaction score
28
Changed Cusco LSD to GR yaris last week. Removing differential was quite easy on jack stands.

- Muffler out.
- Rear sway bar removed from mounts. Would have been bit easier if I would have removed it completely but it was pretty tight on tie rod.
- Open 4 prop shaft nuts from ITCC. Before removing mark prop shaft position to ITCC and prop shaft flange.
- Support shaft with some strap
- Remove vacuum hose and electrical connector from diff.
- Rear diff is mounted with 3 bolts. One in rear, two in diff carrier. I used two ratchet strap for lowering the diff. One in front mounted to subframe, one in back mounted to muffler mounts.
- Not 100% necessary to remove drive shafts. You can open outer upper control arm bolt and tilt upright to get drive shaft out. OR carefully drop diff 15-20cm and pop drive shaft out. Then you must be careful not to break joints or diff side seal. But thats how I got it out.
- Wash the diff well before opening it. Remember to plug vacuum hose.
- Remove diff carrier from diff and open diff side cover
- Swap ring gear to LSD and adjust/shim back lash, gear pattern and bearing tightness. I'll do another post on shimming the diff.
- Check torques from WSM when you put diff back on.

IMG_3655.jpeg


IMG_3648.jpeg


IMG_3652.webp
IMG_3653.jpeg
IMG_3657.jpeg
 
Last edited:
Shimming the diff.

IMG_3661.jpeg


You need to measure backlash between gears. Bit of pain since you need to do it through oil fill hole. WSM states 0.13 to 0.25 mm backlash.
IMG_3667.jpeg


Also gear pattern needs to be inspected with some colour. I used some old oil paint. Plenty of good instructions in internet. WSM also has decent instructions. I used one from Yukon gear and they had also some shimming instructions.
IMG_3674.jpeg

IMG_3675.jpeg

Bearing preload was very close with original shims, but bit loose. WSM states 3.12 to 5.86 Nm torque measured from pinion axle and I had around 2Nm. Ended up to 4Nm with new shim.

Since there is no change in pinion position is guess gear pattern should not move too much. I had pretty good one with original shims.

I couldn’t find measurements for the shim plates anywhere so here it goes id 30mm, od 67mm, thickness around 2,0mm. You can find exact thicknesses from WSM and they go in 0,04 increments and there are 40 different available. I had 2,04 and 2,30 stock.
4AFE8FC2-F2A9-4D51-8880-9175C2D68DC0.jpeg

Also WSM requires heat resistant threadlock for ring gear. Toyota Genuine Adhesive 1360K, Three Bond 1360K or equivalent. I used Sika lock 1272TL.

Price for LSD from dealer in Finland 1182,49 € ( LSD-1C8-L15) 100€ or so for bearings. Shims from Toyota 20€ pcs and long delivery time. I ended up machining those. Total cost for the job maybe 1400€ including assembly beer and vodka for machining guy.

Now down to 200km with diff and it seems to feel similar than one with racing pack. Maybe breaks rear loose easier on tight corners. Very good upgrade for the handling with non racing pack cars, recommend 100%.

The one I have is Cusco RS 1.5 way with 100% lock setting on max, initial lock around 20%. You can adjust max lock down to 60% by arranging the plates and setting on this one can be changed to 1 way also. Used Toyota spec 75w85 diff oil from red line with friction modifiers. No issues what so ever like jerking while parking or tight corners. Locks when needs to be and no more pushing or slipping power out of wheels. Starting point was non racing pack and reason behind that was that used ones were almost 10k€ cheaper here when I bought the car.
 
Last edited:
Thank you for the awesome post. Really informative & useful 👍🏻

I’ve got a Quaife LSD I need to install & have pretty much got my head around all the various measurements & procedures.

Much appreciated!
 
Last edited:
Thanks! Starting is the hardest part. I had diff in the shelf for over a year.

Forgot to mention some tips that could be useful. WSM requires some special tools, but you can do without.

1. Backlash measurement
-Diff rear carrier is good mounting place for magnetic dial gauge stand since it's cast iron. There is decent level surface if you remove one of the mounting bolts. WSM is proposing some fancy stand for gauge.

2. Shimming/bearing preload
-WSM instructs to take ITCC out. It didn't affect much to measured torque so I didn't. If you do, you need some tool go inside bore to measure torque. If you leave ITCC in place you can bolt some plate with 3 holes to prop shaft studs and mount some bolt to center axis to turn the diff.
-You need accurate torque wrench from 0-10Nm range. Some have used also some lever with weight and calculated the torque. I had small dial indicator wrench.
-Initial torque is higher when you assemble diff. Remember to turn diff back & forth few times before actual measurement so bearings seat correctly.
- When you put surface sealant for final assembly preload will go slightly looser. Atleast thats my experience. Depends propably thickness of sealant. I used "right stuff", but some less viscous/thinner could be better. Oil has stayed on righs side of the diff so far.
-New bearings are must to have. Impossible to get inner rings out from old diff.
-Quite obvious, but you need hydraulic press for installing inner ring to new diff
-For outer ring you need to put it in and out multiple times for shimming. Hydraulic press is nice, but you can do it with some longer threaded bar and correct size tools for pushing. For pushing out I had some large socket(push against shim), other side you need some cup type tool. I can check measurements for that.
-I would get new seals if I would do it again. Just for peace of mind. But you can change those without taking diff out if they start to leak.

3. Gear pattern inspection
-Best way to see pattern was to apply paste generously to few ring gear grooves. Then use "special tool"(plate with 3 holes) you made for measuring torque from propshaft mount and use drill to spin diff 30-60 seconds.
-Apply some force/torque to diff bore while you spin the diff. If you have tool for bore nice, if not push some plastic/rubber tool to diff bore. I used some proper size ratchet rubber handle:rolleyes:
 
Thanks TLS,

Your post is gold to me mate.

I was going to ask you about measuring the bearing preload & the method you used; the feasibility of doing so with ITCC still connected etc... seen as you’ve covered all angles, I don’t need to!

Any burning questions I had, you’ve already explained excellently. Thank you for having the cojones to do this job & sharing all the details 👍🏻

Kippis! 🍻
 
Last edited:
Hi I've just got my Torsten diff from Toyota and will start installing tomorrow. I was interested to note that you don't need to remove the drive shafts from the hub assembly. Did you only need to undo the top bolt 1 in my picture? Does that really give you enough movement to pull the shaft out of the diff or do I need to release 2. 3. and 4?
Do you have the torque figures for refit?
Thanks
 
Hi I've just got my Torsten diff from Toyota and will start installing tomorrow. I was interested to note that you don't need to remove the drive shafts from the hub assembly. Did you only need to undo the top bolt 1 in my picture? Does that really give you enough movement to pull the shaft out of the diff or do I need to release 2. 3. and 4?
Do you have the torque figures for refit?
Thanks
Hi SR3RAD,


Hopefully TLS can chime in, the more info the better. I’ve got all my parts ready & left all my notes with my axle mechanic for his perusal.

Here’s an image from the WSM regarding torque specs -

Hope this helps!

IMG_2497.webp
 
Brilliant thanks, could do with the torque figures for diff bolts etc . As one N Yorkie (Pateley Bridge) to another where did you get the WSM from If you don't mind me asking?
 
Here is my small contribution to this thread -

A complete list of 'ONE TIME USE' parts required for replacing/upgrading the differential (not the carrier) that may be of use to someone. All part numbers & torque values are taken from the WSM -


REAR DIFFERENTIAL SINGLE USE/TORQUE TO YIELD PARTS

​

  • 2 X 12157-10010 FILLER PLUG GASKET REAR (39 NM)
  • 2 X 90366-38048 DIFFERENTIAL CARRIER BEARINGS
  • 12 X 90105-11060 DIFFERENTIAL CROWN GEAR BOLTS (98.6 NM)
  • 2 X 90311-42062 DIFFERENTIAL OIL SEALS

  • 2 X 90119-12453 BOLT W/WASHER (82 NM)
  • 2 X 90119-12455 BOLT W/WASHER (86 NM)
  • 2 X 90179-12154 NUT
  • 2 X 90177-22001 AXLE/HUB NUT (216 NM)

  • 1 X TOYOTA GENUINE THREADLOCK/ADHESIVE 1360K (OR another suitable high temperature thread-lock)
  • 1 X 08826-80020 TOYOTA LIQUID SILICONE GASKET
  • X 08885-81070 TOYOTA LX SAE 75W-85 GLS (1 LITRE)


In my particular situation, I'm upgrading the OEM open differential with a Quaife ATB unit. Ben @ Quaife had clarified by email that the use of different sized shims aren't required & that the original shims are to be reused in their respective positions. It would still be prudent to still measure backlash & bearing preload though.
 
Thanks for info, diff now in. ($40/Lt for WX75-85!!) Lets hope it gives me that bit of extra grip in the twisty bits where I've been missing out.
JAL2943.webp
 
View attachment 22495I haven't been following topic too much and it seems you did this already. For others, it sure is possible with only top bolt since I did it with out removing any upright bolts. There is barely enough room to get drive shaft bores out with out damaging seals. So I would highly recommend removing top bolt.
 
Man my rear axles do not want to separate from the diff. What a headache.

I wonder if the inner splines are twisted.
 
Man my rear axles do not want to separate from the diff. What a headache.

I wonder if the inner splines are twisted.
I guess you got the axles to pop out with a firm yank/tug in the end? Think they are retained with a sprung/circular retaining clip on the axle splines from memory.

Noticeable improvement in performance then? 😊
 
I guess you got the axles to pop out with a firm yank/tug in the end? Think they are retained with a sprung/circular retaining clip on the axle splines from memory.

Noticeable improvement in performance then? 😊
i ended up having to take the diff carrier out with the axles attached then remove them on the bench. it was just a bit of a pain.

but yeah, feels nicer than the stock open diff for sure
 
@TLS can you confirm that the diff fluid is not shared with the ITCC? there's a video circulating how nemtec ( ) swapped the rear ring and pinion of their GR corolla to match the ratio of the front to help with the ITCC overheat issue. but while taking the rear diff off the ITCC, he said there's a tiny passage way on the left side that shares the rear diff fluid with the ITCC housing. i sense trolling but I've only ever looked at pictures and diagrams and can conclude that no diff fluid is shared. only a handful of people have taken it apart, and you being one of them. thanks. how's the 1.5 way??
 
No issues with lsd. Great performance upgrade. You can definitely feel difference or it feels same as with racing pack. Came to see what oil I put in. Time for 3rd oil change. Lets see what comes out with oil.
 
Back
Top